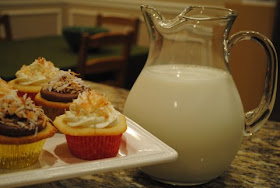
My friend Kyle turned 27 yesterday ON THE 27th and naturally, cake and cookies were needed to celebrate. He loves the coconut cupcakes and per his request, I got to baking. I have been getting pretty good at these coconut cupcakes and they are getting popular around these parts. I used 1/2 of the batter recipe, 1/6 of the filling recipe, and a full frosting recipe and came out with 24 beautiful coconut cupcakes. Kyle and his family just got a new camera and his wife is getting to be a wonderful photographer so they took some nice pictures for me. I frosted some with chocolate frosting this time and it tasted great. Someday I will make a chocolate cupcake with this filling and chocolate ganache frosting and put an almond on top. Maybe I'll call it the almond joy cupcake!
I also made some really cute cookies for Kyle. He loved rinos and I found an adorable rino cookie cutter at the store. With a little royal icing and some time to dry, these cookies are almost cuter than the cupcakes...
Gray shirt and gray rino presents. It was just perfect.
Monday, February 28, 2011
Wednesday, February 16, 2011
Valentine's Cookies
My roommates and I spent some quality time this weekend making some Valentine's Day sugar cookies and listening to Shania Twain. We had so much fun and they turned out SO good. I started with this great dough recipe from Betty Crocker. If you like almond extract, at all, I really suggest this recipe. It stays soft after it bakes and tastes SO good. The cookies also keep their shape well, which is nice.
Betty Crocker Sugar Cookies
And then we started decorating...
Betty Crocker Sugar Cookies
1 1/2 | cups powdered sugar |
1 | cup butter or margarine, softened |
1 | teaspoon vanilla |
1/2 | teaspoon almond extract |
1 | egg |
2 1/2 | cups all-purpose flour |
1 | teaspoon baking soda |
1 | teaspoon cream of tartar |
1. Mix powdered sugar, butter, vanilla, almond extract and egg in large bowl. Stir in remaining ingredients except granulated sugar. Cover and refrigerate at least 2 hours.
2. Heat oven to 375ºF. Lightly grease cookie sheet.
3. Divide dough in half. Roll each half 1/4 inch thick on lightly floured surface. Cut into desired shapes with 2- to 2 1/2-inch cookie cutters. Sprinkle with granulated sugar. Place on cookie sheet.
4. Bake 7 to 8 minutes or until edges are light brown. Remove from cookie sheet. Cool on wire rack. I doubled this recipe that it made about 50 cookies.
After the cookie dough was cooled, I rolled it out and cut it with my really cute V-Day cookie cutters. I have a kit from Williams Sonoma that you can use to stamp words into cookies. I used my own cookie cutters, but used their word stamps to get this little message in them. It turned out SO cute!
We also tried some other messages. MI ELGNIS means "IM SINGLE" backwards. Yeah, it's hard to figure out those cookie cutters.
Also, if you don't have a Silpat, I would suggest it. It was a Christmas gift and I LOVE IT!!!! Nothing sticks to this baby!
After the cookies baked, they looked like this...
This first cookie was made using the cookie cutter that came with the WS kit. It was a little bigger than I needed, but it was adorable.
I made some royal icing and dyed it cute Valentine's Day colors!
And then we started decorating...
This last cookie we made by dying some dough red with food coloring. We mixed the white and red dough a little bit and it turned out marbled like this. These types of cookies are cute because you do not have do put that much frosting on them to make them look nice. This is good for people who are trying to cut back on sugar or just don't like frosting.
We took these cookies and put them in tiny bags I got at a cake store. We tied them with some ribbon and then I gave them out to friends at school. Everyone loved them and they looked adorable.
This "be mine" cookie was the best. It just looked SO SO SO cute.
This was a great project, not too hard, and so fun.
Red Velvet Surprise
This weekend we decided to go to this wonderful little bakery called THE CHOCOLATE. It is in Orem, Utah and is in a cute old house. Almost every room is decorated and you can just go explore and find a place to sit. The cake is to die for, especially the one that is yellow cake with chocolate ganache, loving called "The Husband." They also have a very good Red Velvet cake and it inspired to me to try to make my own. A friend was craving and I was needing to bake and this is what happened...
I hope y’all love this cake as much as I do. Happy love week!
If you have read my blog before you know this, but I like to include the recipes I use and share the love of baking! For this cake I used a recipe from allrecipes.com that turned out really good. I used a cup of sour cream instead of a cup of buttermilk. The batter turned out really thick, but it baked nicely.
Ingredients
1/2 cup shortening
1 1/2 cups white sugar
2 eggs
2 tablespoons cocoa
4 tablespoons red food coloring
1 teaspoon salt
1 teaspoon vanilla extract
1 cup buttermilk (or sourcream)
2 1/2 cups sifted all-purpose flour
1 1/2 teaspoons baking soda
1 tablespoon distilled white vinegar
Directions
Grease two 9 inch round pans. Preheat oven to 350 degrees F (175 degrees C).
Cream shortening and 1 1/2 cups sugar WELL. Add eggs and beat well.
Make a paste of cocoa and red food coloring. Add to creamed mixture. Mix salt, 1 teaspoon vanilla and buttermilk together. Add alternately the flour with the milk mixture to the creamed mixture. Mix soda and vinegar and FOLD INTO CAKE BATTER. DON'T BEAT OR STIR NOW.
Bake for 30 minutes.
When I baked this, I opened the oven at exactly the wrong time, which is why it sort of fell in the center, but it was not too much of a problem. I baked these in two 6” pans, which made a smaller, but taller cake. It just gives a little bit of a different look than 9” pans do.
After the cake cooled, I cut each one in half long ways and stacked and filled them with a cream cheese icing.
Cream Cheese Icing
Ingredients
2 cubes, (or 1 cup) butter
1 8oz package of cream cheese
5 cups powdered sugar
2 – 3 tablespoons milk or cream
1 tsp vanilla
Directions
Cream together the butter and cream cheese. Mix in the powdered sugar a little at a time and then add the milk or cream and vanilla. You can add more sugar or more milk depending on how thick you want it.
Mix this on high speed for about 7 minutes. This is an important part of the frosting process as it will make the frosting fluffy and light. It will also make it whiter, which just looks nice.
I love this frosting recipe. It still has the richness of cream cheese icing, but it also has the fluffy-ness of buttercream so enjoy that!
This cake was small enough that I just spooned the buttercream in between the layers and spread it around. I then put on a layer of icing to act as a dirty ice. This catches all the crumbs and keeps the final icing super smooth.
Freeze this, with the crumb coat, for about 15 minutes and then you can add the final layer of icing. There are a plethora of youtube videos that talk about frosting a cake smoothly with buttercream. Watch it, love it.
Finally, I just added some of my heart sprinkles. I got them in a cute little Valentine’s day packaged my mom sent me. What can I say, she just gets me. I think it turned out pretty cute and it was easy. We cut her open and it just looks so beautiful to see that bright red cake and the stark white frosting. I also had some left over batter so I made a few cupcakes and decorated them with the same sprinkles and icing.
Monday, February 14, 2011
Lobster Tails and Cream Puffs
So... as you probably know, I am quite the avid Cake Boss watcher. Thanks to my friend for introducing me. I owe you, again.
At Carlo's there is this amazing pastry called the Lobster Tail! It is shaped like well, a lobster tail and it is flaky and wonderful and filled with this great cream that tastes like a summer afternoon. Naturally, I wanted to make it and so on my 3 day break from school I thought it would give it a try.
The recipe is in my Cake Boss book and the intro says things like:
"Unless you are a professional baker, and an accomplished one at that, you probably shouldn't try to make these." and "If you can make these and they come out well, please move to Hoboken and apply for a job at Carlo's."
Since I am semi-pro and I would love to move to Hoboken and work at Carlo's, I just knew I had to give it a try.
Here is what happened...
And that's after about 10 minutes of trying to roll it out. The dough is just a mix of flour, water, and salt so it is super stiff and pretty much you need a commercial mixer and a commercial pastry dough roller to make this stuff work. We ended up just scrapping the whole project but here is what should have happened...
Since we wanted treats and Lobster Tails just wasn't cutting it, we decided to make some cream puffs. You can look up the recipes in the Cake Boss book. I just don't feel like typing it all out. You do have to cook the dough over the stove and then add the eggs in. It looks weird at first, but by the time you are done, it will be normal, promise. You have to pipe the dough into the cream puff shape and then you pipe the cream into the center. They were pretty darn good.


